Showing posts with label For the Home. Show all posts

Wednesday, February 15, 2012

BOARD & BATTEN IN THE KITCHEN

I have needed wanted to change our home decor for a while now.  It took a couple years of bitching begging but I finally got the hubs on board...yay!!  The first step was painting (you can see part of the process here).  Next, with help from one of our more-than-wonderful neighbors, the board & batten went up.  


I didn't do a step by step post because there are already so many great how-to's out on the web. You can check out a couple I found helpful here & here.

BEFORE
 (I had already started to rip down the wallpaper before I realized I forgot to take a pic)

PROGRESS

AFTER

I am SO happy with the way it turned out!  And it will look even better when we get rid of that curio, paint the buffet and replace the kitchen table & chairs (ordered last week!!).  I am still deciding on a color for the buffet.  My original thought was to paint it black but I am tempted to go bolder with a pop of color, maybe orange.  Any suggestions?

Tomorrow, our very handy neighbor is coming over again to help the hubs put trim around the living room window, change out the front door trim to match and start the process of replacing our baseboards. 


I will be sure to post pics soon. 

Linking up with:
HookingupwithHoH

Hope your Wednesday is treating you well!
Smiles~Beth

Thursday, January 5, 2012

DIY CANVAS PRINTS

Some of you know that I watch 2 little boys a few days a week.  They are 2 very sweet little guys.  I starting watching them when they were only 10 weeks old.  We consider them family, along with their Mom & Dad, and are very blessed to have all of them in our lives.  Luke & Cole's parents always treat me so well around the holidays and this year I wanted to give them something very special in return.  It took me a while to come up with something but once I saw this tutorial on Pinterest by The Sassy Pepper I knew it would be perfect.  Actually, I am so happy with how they turned out that I am going to make some for myself. 


I used my Silhouette, some vinyl & black acrylic paint to make the "a few of our favorite things" canvas. I want to note that although she recommends using matte mod podge I used a gloss.  It was what I had on hand.  When I make more I will definately take her advice and use the matte.  Don't get me wrong, they turned out beautifully, they are just a little shiny and in certain lights show imperfections.

A big thanks to The Sassy Pepper for this easy and fabulous tutorial!

Smiles~Beth

Thursday, November 3, 2011

FALL WREATH TUTORIAL

While perusing Pinterest one evening (oh my goodness, I could spend hours wasting time finding inspiration on there!) I came across this Fall wreath.  I knew right away that I wanted to make one of my own.  So I did!


Want one for yourself?

Here is what you need:
~Spanish Moss, large bag you will have extra
~Styrofoam wreath or you could try this cheaper version
~Burlap, 1/3 yard finished strip 55"x 5", you will have to piece it together
~Fake pumpkins or whatever you want to add to your wreath :)
~Glue gun
~Glue sticks for glue gun
~Spray glue I used Elemer's Craft Bond & Aleene's Crystal Clear Tacky Spray
~Brown paper sacks or something else to protect your surface while using spray glue
Sewing machine & thread optional

Be warned that this project is messy!

First, open up that bag of Spanish Moss, loosen it up (it's all compressed together, you will want to break it up so it is easier to apply to your wreath) and then spray a small section of your wreath with spray glue.  Grab your loosened up Spanish Moss and press it down on top of your wreath.


Using spray glue, add the Spanish Moss in small sections all the way around the wreath until the top is covered.  Then add the Spanish Moss to the sides of the wreath, inside and out (you could do this when you do the top).
It should look like this when you are done...
Front view
Back view
 I did the back of my wreath next but you don't have to
(noone will see it once it is hanging).

Now grab those cute little pumpkins (or other Fall decor) and figure out where you want them placed on your Spanish Moss covered wreath.

When you are happy with your placement grab your glue gun and put some glue on the necessary spots.

Your wreath should look similar to this...


Now is the time to add more Spanish Moss to any bare spots you may have.

See where you can see the styrofoam...add more Spanish Moss if you can see foam on your wreath.

You are almost done!
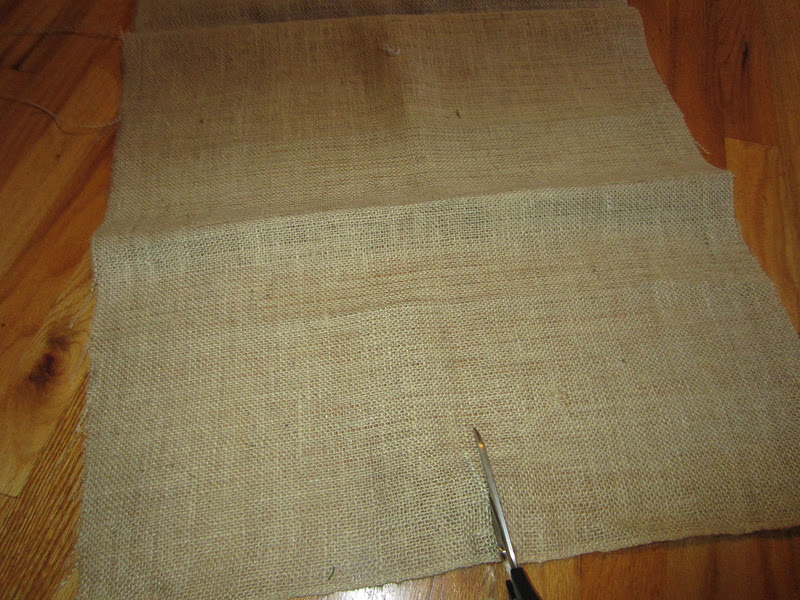
Cut the width (selvedge to selvedge) of your burlap into 5" strips. 


I sewed 2~5" strips together which was too long for me
(if you don't have a sewing machine or don't feel like sewing you could use your glue gun to keep the 2 pieces together) I folded my long strip in half lengthwise,
at the seam, and cut (folded at the seam) to 27.5" inches. 
This gave me 1 strip measuring 5"x 55" with the seam in the center.

Grab your wreath and put your burlap strip through the
center (with seam at the under part of the top of the wreath, that way you can't see it). 

Make a bow at the top, hang, and now you have your own
Fall wreath...yay you!!!


Hope you enjoy your new Fall Wreath as much as I do mine!
Please feel free to ask any questions you may have.

Linking up to :
HookingupwithHoH


Made by you Monday @ Skip to my Lou
Smiles~Beth

Tuesday, October 25, 2011

HALLOWEEN FRAMES

I added a couple of Halloween frames to our decor this year.


Both frames are inexpensive wood frames purchased from Hobby Lobby.  For the BOO! frame I simply painted the wood frame with acrylic paint by Folk Art (color: vivd orange, also bought at Hobby Lobby).  Once dry, I hot glued different sizes of googly eyes to the frame.  I then cut a piece of scrapbook paper the size of my picture opening and added BOO! to the center (I used vinyl that I cut using my Silhouette).  Easy peasy!
For the spider frame I simply used Mod Podge to adhere  1 large (12x12) piece of scrapbook paper to the front & sides of the frame.  I then cut another piece of scrapbook paper the size of my picture opening.  Again, I use my Silhouette to cut out the simple spider shape out of vinyl (don't have vinyl, just use scrapbook paper. it will be just as cute).  I added a couple googly eyes and viola, 2 simple Halloween frames complete. 

I will definately be making some Christmas frames soon using the Mod Podge method.  Maybe I will take pictures along the way and share the process ;)

Have you added new Halloweenish decor to your home?

Smiles~Beth

Friday, October 21, 2011

HYDRANGA WREATH

Looking for my Pocket Clutch giveaway?  Click here to enter but hurry because it closes at midnight, cst.

 I saw this tutorial by Vanessa at V & Co a couple of months ago  and fell in love.  I immediately ran out and bought all of the supplies.  Well, they sat in a bag for 2 months until the other day.  And, look, now I have my very own hydranga wreath!!


I just LOVE it!!!  Wishing I had taken the time to make it months ago.  Especially since it game together so quickly.  Thanks, Vanessa!!!


This one turned out so well that I decided to make a Fall wreath inspired by one I saw on Pinterest.  I ran out of spray glue so it'll have to wait a few more days but here is a sneak peek.


Hope everyone has a great weekend!!!  Smiles~Beth

Linking up to

Friday, July 1, 2011

AMERICAN FLAG ART {A 4th OF JULY KIDS CRAFT}

I saw this adorable red, white & blue craft idea over at Creative Kristi. My boys are getting older and sometimes roll their eyes when I ask them to assist in crafts but I couldn't pass this one up.  

Fortunately there weren't any huffs, puffs or rolled eyes during the making of this American Flag
  
I even got the boys to pose with their OOAK artwork.


 Perfect for a mantle or on our front porch.

Sorry for the bad photo...the sun was setting so the shadows are awful
and I really should have cleaned our storm door...yikes!!
I absolutely LOVE how it turned out (paint splatter and all!).
FYI~I used a 16x20 canvas so I could get it out and admire those feet and hands every year.  Plus, I needed it to be big enough to accomodate those big feet!  My boys are 11, 8 & 5  in case you are trying to figure out how big of a canvas you will need for your little ones fingers and toes.  I have no doubt you could fit quite a few more prints on there if you have younger children.  I also used acrylic paint from a local craft store.  It dried quickly and washed off easily. 

Are you working on any red, white & blue projects this weekend?

I am linking up at Tatertots and Jello.  Go check out all of the other great inspiration!
Smiles
~Beth

Friday, June 17, 2011

A WELCOME GATHERED PILLOW {FOR MY MOM}

I took a little break from quilting my Grandma's quilt (I didn't end up using any of those quilting lines but that story is for another day) to make my Mom a sweet ruffled pillow for her birthday (coming up on Tuesday).  I just had to share some pics before we are off to another, you guessed it, baseball game (GO SAINTS!).


I followed a wonderful tutorial by Suzanne over at Just Another Hang up...thanks Suzanne!  The only difference between mine and hers is that I used Robert Kaufman quilter's linen instead of muslin and I added a few little touches by using vinyl heat transfer (all words cut out with my good ole' Silhouette).

You can bet I will be making one for myself as well!

Hope you all have a wonderful weekend!

Linking up to~
Tatertots and Jello!
Blue Cricket Design
Smiles
~Beth