Friday, April 29, 2011

MY LITTLE PRINCE

While picking up my littlest monster at preschool yesterday I noticed a sign posted by the door of his classroom "Imagination day on Friday, please dress up like princess/prince".  My first thought was "WHAT?!...I have 3 boys and absolutely NOTHING prince-like at home!".  Don't get me wrong, I am all for imaginative play and of course we have swords and knights (little fisher price figures) but he couldn't wear those to school.  It wasn't long before I came up this...

I used my Silhouette (of course!)
Images are Crown_1_C00226_23067 & Frog_C00558_23067
You'll have to excuse his closed eyes and rain boots.  There isn't any rain here today but the boots are new so he just had to wear them outside.  As for the closed eyes, it's quite sunny here today (hooray!!) and it was either let him close his eyes or post pictures like these...


Hope everyone has a happy friday!!!

Smiles
~Beth

Tuesday, April 26, 2011

QUICK & EASY WONKY BLOCK TUTORIAL (CHARM PACK & JELLY ROLL FRIENDLY)


A friend of mine came across these really fun and cute blocks on flickr.  She searched for a tutorial on how to make them and couldn't find one. After looking at the block I thought I could figure it out & I did :). Since I was taking pics for my friend anyway I decided to post a quick tute on how to make these adorable blocks.   Here is what the finished "wonky" block will look like (see, just a little wonky but super cute!)...


For this block I used a charm square (precut 5" square) and a 28" x 2.5" strip of coordinating stripe for the borders.  I didn't have a jelly roll for this project so I just used some yardage I had on hand.  If you don't have a charm pack you could also use yardage for your squares.  Before you get started you should know that there is a little waste during this process (you will be making a 9" square and trimming it down to an 8" sqaure).  Be sure to calculate properly before cutting into your yardage!  If you are using precuts then you have nothing to worry about :)

1.  Cut your 28" x 2.5" strip into 2~5" x 2.5" strips and 2~9" x 2.5" strips. 

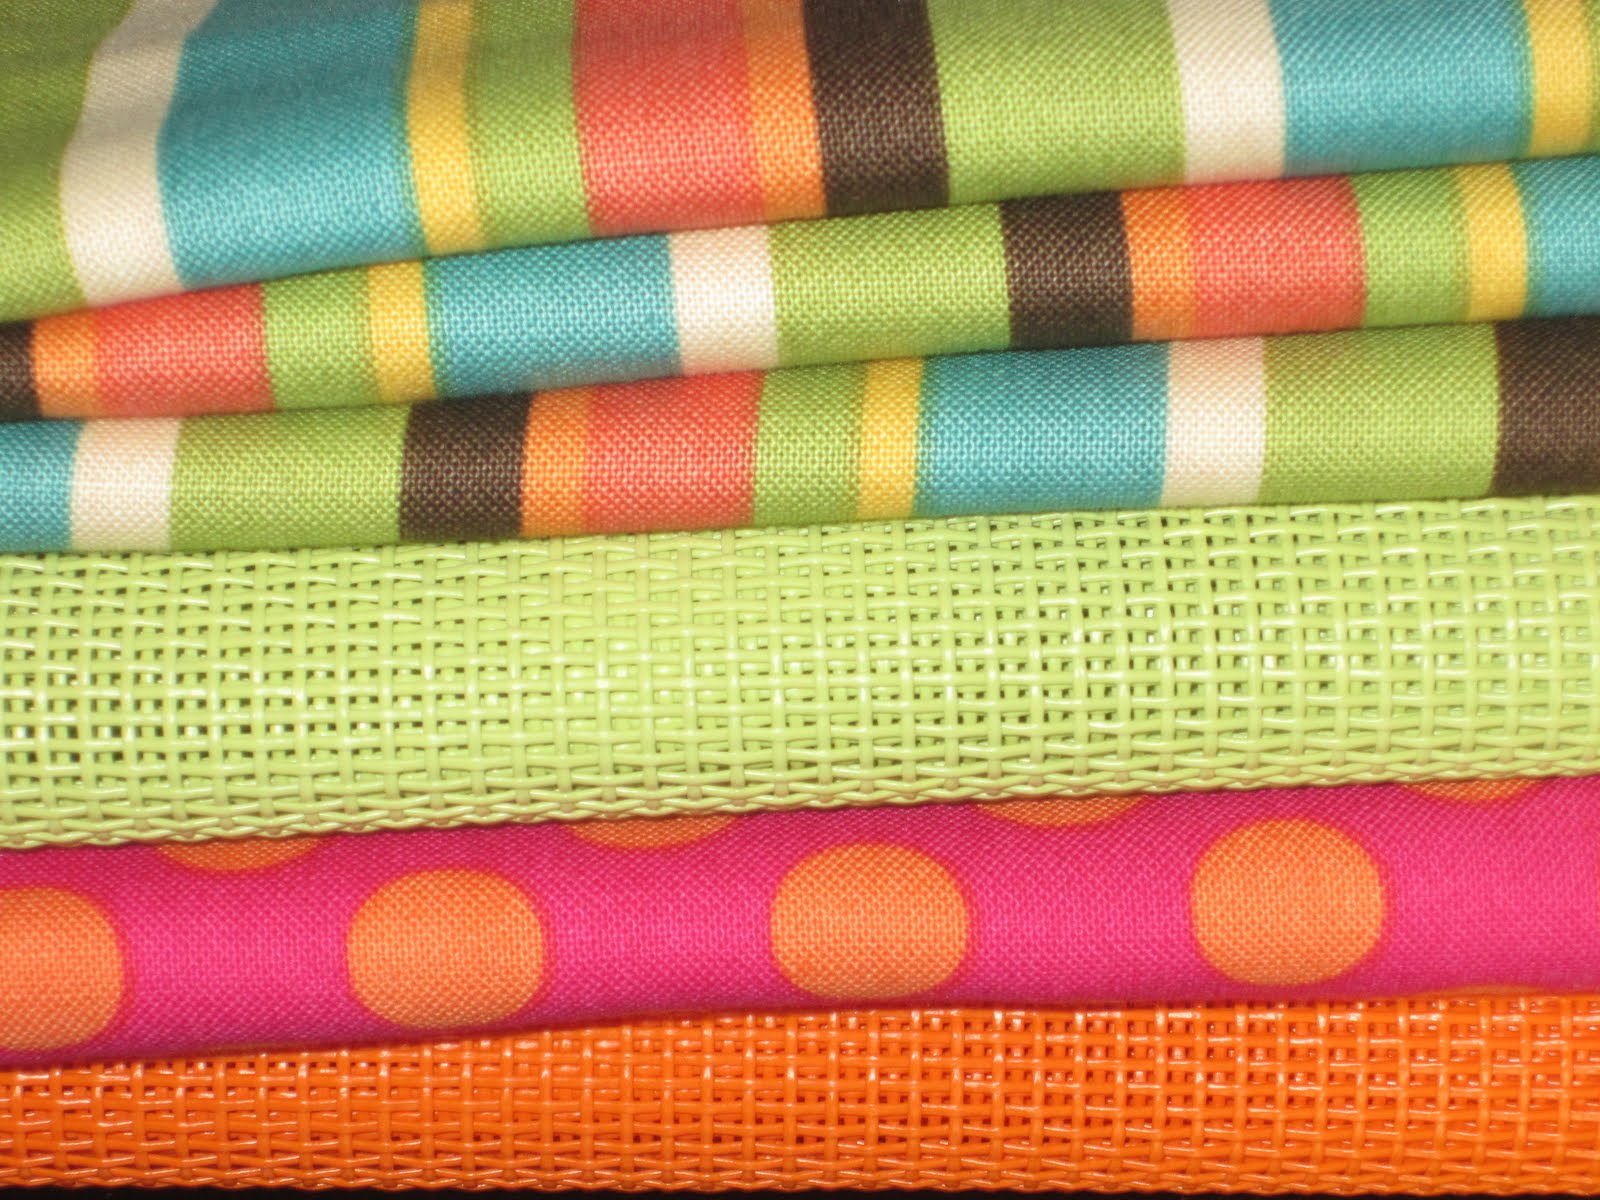
1~5" square, 2~5"x 2.5" strips, 2~9"x 2.5" strips (sorry, I stacked my strips)
2. Using a 1/4" seam, sew your 5" x 2.5" strips to 2 opposite sides of your 5" square (example: left & right or top & bottom), right sides together.  Iron seams flat(I sew mine open but sewing them to one side is perfectly fine too).  You should now have something that looks like this...


3.  Using a 1/4" seam, sew your 9" x 2.5" strips to the long side of your block, right sides together.  Iron seams flat.  You should now have a block that measures 9" square that looks like this...


You could totally stop here and still have a very cute block but if you want to add a little something to your finished quilt top I would go another step further to get that "wonky" look.

4. I didn't want my block to be completely off kilter but I wanted it to be noticeable so I chose to tilt my block 1" on my cutting board.  (You could easily tilt your block a little less or more to get the look you want).


5.  Cut your tilted block to 8" square.


After you have trimmed all 4 sides, pat yourself on the back because you have made a wonky block...hooray!!  Easy, right?  It should now look like this...


Make some more, add a little sashing and you will have one fun quilt top!  Please let me know if you have any questions or get stuck on something.  I would be more than happy to help :)  Also, if you make a quilt using this wonky block tutorial I would LOVE to see pics!

Smiles
~Beth

SUMMER TOTE GIVEAWAY WINNER!

Thanks to everyone who entered the giveaway! 

Ok random.org, do your thing...and the winner is...

True Random Number Generator 3
Powered by RANDOM.ORG

Comment #3 was left by Jessica.  You should have an e-mail message from me in your inbox.
Blogger Jessica said...
I'm already a follower!
April 22, 2011 11:52 PM

Congrats to Jessica!  Hope everyone is having a great week so far!

Smiles
~Beth

Sunday, April 24, 2011

HAPPY EASTER!

Looking for the Summer Tote giveaway?
click here

Happy Easter!  I hope today brought you happiness and you were able to celebrate with the ones you love most!


Smiles
~Beth

Friday, April 22, 2011

WHO WANTS A SUMMER TOTE?!

My boys were out of school today and I didn't have any of my "extra" kiddos.  It was the perfect day for lunch and a movie with just me and my boys.   I know they don't think much of it but it's days like these that really make me happy.  Ya know, the little things.  I think we should do it more often :)

Ok, ok, I know most of you are probably here for the giveaway I promised to post today.  Well, here it is...


A great summer tote you can take with you to the pool or beach (if you are so lucky!!)  Fill it with towels, water, snacks, sunscreen, whatever you want!

Tutorial by OCD: obessesive crafting disorder

I made it out of "pet screen" fabric and some quilting cotton from the Frolic line by Sandy Gervais for Moda.  Pet screen is a durable mesh-like fabric so it is perfect for wet towels and suits. 

Want THIS bag?  It can be yours.  All you have to do is:
1. Leave me a comment and tell me if you live by a beach (so lucky if you do!)
2. Become a follower of this blog, Sewing for Sanity.  Then leave me a comment telling me you did.  Already a follower?  Just leave a comment letting me know.
3. Blog, tweet or facebook about this giveaway & then come back and leave a comment with a link to your post.

Ok, that's 3 chances to win.  Be sure to leave a separate comment for each entry AND include an e-mail or make sure it is on your profile.  No e-mail address means no entry :(

You have until 10:00 p.m. (central standard time) on Monday, April 25 to enter.  The winner will be announced on Tuesday.  I will let random.org do the honors.  Good luck!

*I linked up at Tatertots and Jello!

Smiles
~Beth

Wednesday, April 20, 2011

I'M BACK!!!

Boy, did those kidney stones really knock me back!  After 6 days, I am happy to be feeling about 95% back to normal :)  I am also really itching to sew again!

In my last post I mentioned having a giveaway for my readers this week and I promise not to disappoint.  I should have the handmade prize ready by the weekend so be sure to come back and enter sometime on Friday.  Until then, here is a little peak to keep your minds wondering...


What have you been working on?

Smiles
~Beth

Friday, April 15, 2011

I'M TOO YOUNG FOR THIS!

I don't have any new projects to show you today :(  Instead of crossing things off of my long to do list I am stuck in bed with a bad back.  Thankfully my wonderful husband has taken the day off to help with the kids and the laundry (thank you, honey!).   I think I will take this time to come up with a fun giveaway for all of my wonderful readers.  Be sure to visit next week to get all of the details :)

Smiles
~Beth

Monday, April 11, 2011

A FORT KIT, ANOTHER BAG & A SHIRT

It's no secret that I am a BIG fan of Celebrate the Boy month hosted by MADE and Made by Rae.  You can see some of the things I have made using tutorials from Celebrate the Boy here, here and here.  

When my littlest monster was invited to a birthday party last week I new just the gift to make...the Fort building Kit.  I found the idea during Celebrate the Boy month over at Saltwater Kids.  


I love this idea for a gift (thanks Saltwater Kids!).  It's fun, personalized and encourages imaginative play!  What's not to love?!  I found most of the items at the $ store, except for the twin flat sheets.  I bought those new at a department store (I had a great coupon!).  I used an old t-shirt of my husband's for the ties on the sheets.  I used colored denim for the bag.  And, of course, I just had to use my Silhouette to personalize the gift.  The birthday boy LOVES hockey so I put a hockey player on the front of the bag.  I also put his name on the flashlight.  Ya know, in case his brother tries to say it's his ;).

The party was at a Mavericks (a local CHL hockey team) game.  We were asked to wear orange to help support the team.  Adam (aka littlest monster) didn't have an orange shirt so I bought a new one and added a little something to it (I used my Silhouette, of course). 


The party was a lot of fun & to make it even better the Mavericks won...whoo hoo!!!  If you live in the Kansas City area and haven't been to a game yet, you really should go.  They are in the 2nd round of playoffs so the games are sure to be good. 

Happy Monday!

Smiles
~Beth

Sunday, April 10, 2011

FUN BAG FOR A BOY

Making bags is alot of fun.  I like that I can usually whip one up in an afternoon and that they can be as simple or as detailed as I want.  When my boys are invited to a girls birthday party I usually make them a cute bag/purse and put a few little goodies inside like bubble gum and some lip gloss.  They are always so happy to have something that was made just for them.  I have found that it is harder to come up with good handmade gift ideas for boys.  In comes Celebrate the Boy month.  I have posted previously about it here.  If you aren't familiar with Celebrate the Boy or haven't ever been over to MADE & Made by Rae you are in for a treat.  Be sure to grab yourself a little snack and beverage first though.  You may easily get caught up looking at all of their beautiful pictures and fantastic tutorials. 

I found 2 really great bag tutorials and put them to use recently.  (I also found the Peek~a~boo bag tutorial by Make it Perfect during Celebrate the Boy, she was a guest blogger).
Retro Duffel bag by Saltwater Kids

I made this Retro Duffel Bag for a friend of my son (monster #2).  It came together rather quickly.  I only changed a couple of things 1. I used belting for the handles rather than making my own (saved on time)  2. I used my Silhouette to add the "R" on the front to make it a little more personal.  I didn't have time to put together a fort kit like suggested on SaltwaterKids blog (aren't those pics of her boys great!!!?) so we gave him a little $ to go along with it.  8-year olds like money, right?

I will post about the other tutorial tomorrow (hint~it includes the fort kit!).

Smiles
~Beth

Saturday, April 9, 2011

DIAPER BAG FOR BABY DOLLS (or a cute little purse!)

I had a request from a sweet little girl.  For her birthday, she wanted me to make her a diaper bag to use when she plays with her baby dolls.  Having 3 boys, it's not very often that I get to make cute little girl things so I jumped right on it.  Here is what I came up with.


The birthday girl helped pick out the fabric from my stash.  I think she did a fabulous job...I love the bright colors!  The bag is complete with 5 outside pockets and 3 inside pockets.  Just the perfect size for all of her American Girl doll needs :)  Or, it could also double as a purse.  I love it when things have more than 1 use!


I used my Silhouette to make a personalized label.  That thing has come in so handy!  I added the year so it would be easier to know when I made this particular bag for her.  You can see a picture of the messenger bag I made for her birthday last year here (it's the one at the bottom of the post).

I don't have a link for a tutorial this time since I just kinda made up the pattern as I went along.  If you have any questions about the bag, please don't hesitate to ask.

Hope you are enjoying your Saturday.  It is sunny and beautiful here...yay!

Smiles
~Beth

Tuesday, April 5, 2011

PEEK~A~BOO BAG

Wow, I have been so busy with practices, games and projects that I didn't realize it's been so long since my last post...oops!  Hope you are enjoying the new scenery!  Here is one of the little things that kept me busy in the last week.

This cool peek~a~boo bag was made for a neighbor for his birthday.  You can find an easy tutorial on Make It Perfect.


This bag is perfect for legos or any other special things that your little one would like to tote around with them.  Could even work for an overnight bag.  The possibilities are endless :)


The birthday boy has graduated from the bigger legos to these smaller, more challenging legos so we took out the block in the above picture and put this box inside. 


I knew both gifts were a hit when he grinned from ear to ear about the legos and then went straight to his room to fill the bag up with his favorite bedtime items.  That is exactly why I love sewing so much.  It truly makes my heart happy to see others so excited about a gift I made just for them.

I have 2 more bags to show you this week and a custom crib bedding set.  Hope you come back soon!

Smiles
~Beth