Showing posts with label Holiday Fun. Show all posts

Sunday, December 25, 2011

HAPPY HOLIDAYS!

Merry Christmas to those of you that celebrate!  And to those that don't, Happy Sunday!! 

In preparation for this holiday season I have been very busy at my sewing machine.  I am excited to share some of the gifts I made for loved ones (posts to come this week!).  For now I would like say thank you for coming by and wish all of you a very memorable and funfilled Christmas!


Smiles~Beth

Thursday, November 24, 2011

HAPPY THANKSGIVING

It's a very busy time around here but I wanted to pop in and say hello and wish all of you a very Happy Thanksgiving.  If you aren't from the states then I wish you a very happy day.

Today I am most thankful for my family.  I feel so blessed to be able to spend this Holiday with so many people I love.  Of course, these little monsters make me feel blessed everyday!


I hope that no matter where you are today that it was spent with those you love most and filled with wonderful memories.

Smiles~Beth


Thursday, November 3, 2011

FALL WREATH TUTORIAL

While perusing Pinterest one evening (oh my goodness, I could spend hours wasting time finding inspiration on there!) I came across this Fall wreath.  I knew right away that I wanted to make one of my own.  So I did!


Want one for yourself?

Here is what you need:
~Spanish Moss, large bag you will have extra
~Styrofoam wreath or you could try this cheaper version
~Burlap, 1/3 yard finished strip 55"x 5", you will have to piece it together
~Fake pumpkins or whatever you want to add to your wreath :)
~Glue gun
~Glue sticks for glue gun
~Spray glue I used Elemer's Craft Bond & Aleene's Crystal Clear Tacky Spray
~Brown paper sacks or something else to protect your surface while using spray glue
Sewing machine & thread optional

Be warned that this project is messy!

First, open up that bag of Spanish Moss, loosen it up (it's all compressed together, you will want to break it up so it is easier to apply to your wreath) and then spray a small section of your wreath with spray glue.  Grab your loosened up Spanish Moss and press it down on top of your wreath.


Using spray glue, add the Spanish Moss in small sections all the way around the wreath until the top is covered.  Then add the Spanish Moss to the sides of the wreath, inside and out (you could do this when you do the top).
It should look like this when you are done...
Front view
Back view
 I did the back of my wreath next but you don't have to
(noone will see it once it is hanging).

Now grab those cute little pumpkins (or other Fall decor) and figure out where you want them placed on your Spanish Moss covered wreath.

When you are happy with your placement grab your glue gun and put some glue on the necessary spots.

Your wreath should look similar to this...


Now is the time to add more Spanish Moss to any bare spots you may have.

See where you can see the styrofoam...add more Spanish Moss if you can see foam on your wreath.

You are almost done!
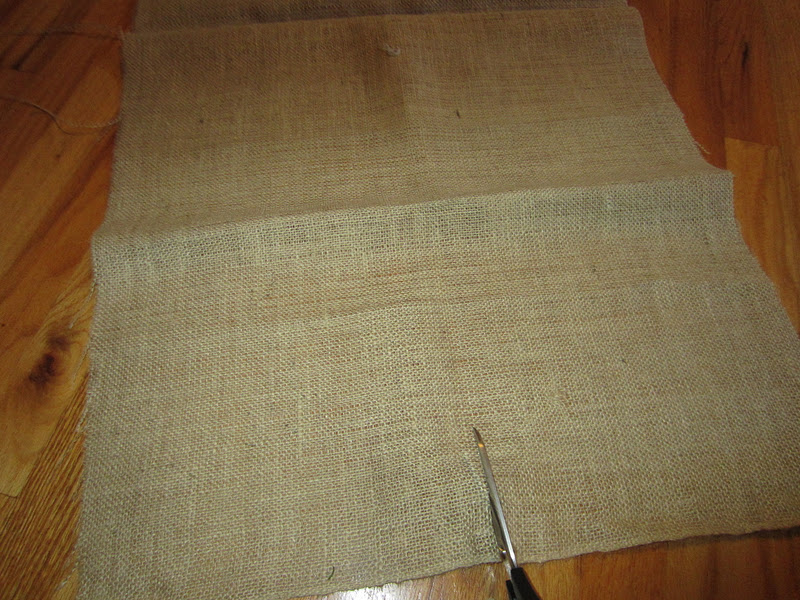
Cut the width (selvedge to selvedge) of your burlap into 5" strips. 


I sewed 2~5" strips together which was too long for me
(if you don't have a sewing machine or don't feel like sewing you could use your glue gun to keep the 2 pieces together) I folded my long strip in half lengthwise,
at the seam, and cut (folded at the seam) to 27.5" inches. 
This gave me 1 strip measuring 5"x 55" with the seam in the center.

Grab your wreath and put your burlap strip through the
center (with seam at the under part of the top of the wreath, that way you can't see it). 

Make a bow at the top, hang, and now you have your own
Fall wreath...yay you!!!


Hope you enjoy your new Fall Wreath as much as I do mine!
Please feel free to ask any questions you may have.

Linking up to :

HookingupwithHoH


Made by you Monday @ Skip to my Lou
Smiles~Beth

Tuesday, November 1, 2011

HALLOWEEN PICS

Hope you all had a fabulous time out and about on Halloween.  Here are a few of my favorite pics from the night...enjoy.


Happy Tuesday!  Can you believe it's already November?!

Smiles~Beth

Tuesday, October 25, 2011

HALLOWEEN FRAMES

I added a couple of Halloween frames to our decor this year.


Both frames are inexpensive wood frames purchased from Hobby Lobby.  For the BOO! frame I simply painted the wood frame with acrylic paint by Folk Art (color: vivd orange, also bought at Hobby Lobby).  Once dry, I hot glued different sizes of googly eyes to the frame.  I then cut a piece of scrapbook paper the size of my picture opening and added BOO! to the center (I used vinyl that I cut using my Silhouette).  Easy peasy!
For the spider frame I simply used Mod Podge to adhere  1 large (12x12) piece of scrapbook paper to the front & sides of the frame.  I then cut another piece of scrapbook paper the size of my picture opening.  Again, I use my Silhouette to cut out the simple spider shape out of vinyl (don't have vinyl, just use scrapbook paper. it will be just as cute).  I added a couple googly eyes and viola, 2 simple Halloween frames complete. 

I will definately be making some Christmas frames soon using the Mod Podge method.  Maybe I will take pictures along the way and share the process ;)

Have you added new Halloweenish decor to your home?

Smiles~Beth

Friday, July 1, 2011

AMERICAN FLAG ART {A 4th OF JULY KIDS CRAFT}

I saw this adorable red, white & blue craft idea over at Creative Kristi. My boys are getting older and sometimes roll their eyes when I ask them to assist in crafts but I couldn't pass this one up.  

Fortunately there weren't any huffs, puffs or rolled eyes during the making of this American Flag
  
I even got the boys to pose with their OOAK artwork.


 Perfect for a mantle or on our front porch.

Sorry for the bad photo...the sun was setting so the shadows are awful
and I really should have cleaned our storm door...yikes!!
I absolutely LOVE how it turned out (paint splatter and all!).
FYI~I used a 16x20 canvas so I could get it out and admire those feet and hands every year.  Plus, I needed it to be big enough to accomodate those big feet!  My boys are 11, 8 & 5  in case you are trying to figure out how big of a canvas you will need for your little ones fingers and toes.  I have no doubt you could fit quite a few more prints on there if you have younger children.  I also used acrylic paint from a local craft store.  It dried quickly and washed off easily. 

Are you working on any red, white & blue projects this weekend?

I am linking up at Tatertots and Jello.  Go check out all of the other great inspiration!
Smiles
~Beth

Sunday, April 24, 2011

HAPPY EASTER!

Looking for the Summer Tote giveaway?
click here

Happy Easter!  I hope today brought you happiness and you were able to celebrate with the ones you love most!


Smiles
~Beth

Thursday, March 17, 2011

HAPPY ST. PATRICK'S DAY!

Oops, I meant to get this post out this morning! 

To assure none of my little monsters get got pinched (ouch!) today they will all be wearing wore a little green (and so will did I!).  A couple of them are even sporting a Mommy~made shirt :) 


The grey tee was actually made last year but it still fits so less work for me this year, hooray!  I never got around to satin stitching the shamarock and letters.  Oh well, there is always next year!  I used my Silhouette to create the "moms lucky charm" shirt.  It hardly took any time at all and it looks like I bought it.  I sure do love that thing!!  The green tee was a hand~me~down (store bought) from my nephew.  Even though I feel very lucky to have ALL of my boys I think it is pretty darn funny cute.  Don't worry, he knows I love him very much!

Hope you all remembered your green!

Smiles
~Beth

Monday, February 14, 2011

LAST MINUTE VALENTINES SHIRT

Thought I would share this cute little shirt I whipped up for Adam last night.  I saw the idea on Groopdealz the other day.   I knew I wouldn't be able to get in time for today so I made my own using my Silhouette machine.  It took all of 10 minutes!


I hope your day is filled with hugs & kisses!  Happy Valentine's day!

Smiles
~Beth

Thursday, February 10, 2011

VALENTINE TREATS

I came across this adorable idea by Kalleen from At Second Street for Valentine treats over at Tatertots & Jello.  I just had to make them for my littlest monster's pre-k class.


Sorry about the dark photo...I took it at 11:00 last night

Here are a couple of other cute ideas.  I made these last year.


I would love to see any creative Valentine's you are making!

Smiles
~Beth

Thursday, January 20, 2011

SNOW DAY

The boys had ANOTHER snow day today.  If you don't live around here then you should know that today makes day #5 (between last week and this one!).  And since there were already two scheduled days off that means the boys have been to school/pre-k only 2 days out of the last 10.  It's like Christmas break all over again!  As much as I love them I am crossing my fingers that school will be back in session tomorrow.  Since we didn't get a chance to play outside last week we took the boys sledding today (after they helped shovel the driveway, of course).


Even Rally helped! 


I always loved making snow angels.


Time to hike up the hill.


The boys all got a turn to jump a ramp on the hill. It was a blast!


Now that playtime is over I must go work on my challenge that is due on Monday.

Don't forget that you have a couple more hours to enter my little giveaway.  I will announce the winner tomorrow.

What did you do today?

Smiles
~Beth

Saturday, January 1, 2011

HAPPY NEW YEAR!

Happy New Year to all of my blogger friends!!!  You have truly made 2010 a great year for me.  I can't wait to get to know you better in 2011!

It wouldn't be a new year without resolutions so here are some of the things that I am going to work this year.
     1. Balance.  This is my first priority.  I definately need to find a good balance between everyday life things (like laundry, etc), my kiddos, my hubby, family time and "me" time (sewing, blogging, etc.)  
     2. Health.  I will be turning 35 this year (yikes!!).  I really need to make an effort to live a healthier life.  And not just with food and excercise.  I want to have healthier relationships, both in the physical world and the spiritual world. 
     3. Quilts.  I want to make mostly quilts this year.  I enjoy making them so much but only made a few in 2010.  This year my monsters will definately get their own (and me too!).

Hopefully during the process of finding better balance and health I will set a good example for my boys. 

If you have a resolution or have set any goals for 2011 I would love to hear about them.  Whatever they are I wish you the best!

Smiles
~Beth

Monday, December 27, 2010

SNOWMAN SHIRT TUTORIAL

Hello friends!  I hope everyone had a wonderful Holiday.  Ours was filled with family, fun and memories.  We are now enjoying the calm after such a busy few days.  

I made my littlest monster this adorable snowman shirt a couple of weeks ago.


He loves it (if you couldn't tell).  I thought it would be fun to share it with you.  It is the season for giving after all.   I had good intentions of getting it posted to you before Christmas but, well, I ran out of time.  So, here it is now.  A simple and quick snowman shirt tutorial...enjoy!

Things you need:


White shirt
Black cotton fabric scraps
Orange cotton fabric scraps
White cotton fabric scraps
Pellon Wonder-Under  (you can find this at Hobby Lobby or Joann, by-the-yard or in a package as shown in link)
Sharp scissors
Pencil
Disappearing ink pen
Iron
Heat n' Bond fusible stabilizer (optional...you can find this at Hobby Lobby or Joann, by-the-yard or in a package as shown in link)
Coordinating thread (optional)
Free template (below)
 
Right click, save to computer, then print from saved document.

The big cirlcle is for the eyes (black fabric)
The small circle is for the eyes (white fabric~2) & for the button mouth (black fabric~5)

Now, you can find all of the details on how to make your own by using my Turkey Shirt Tutorial.
I would love to see pics of your snowman shirts when your done!  If you have any questions please don't hesitate to ask.  Have fun!
Smiles
~Beth

Saturday, December 25, 2010

MERRY CHRISTMAS!

Merry Christmas from our family to yours!  May your day be filled with family, fun and great memories!


Smiles
~Beth